


8/19/2025

|
 |
|
 |
|

A Radio-Controlled 1:36 Scale Model
Next Page | Latest Entry | Table of Contents
click pictures for a larger version
 The idea of building a large scale sailing model square-rigger
had always been floating around in my head, but seeing an article in a 1983 Model Ship Builder magazine about a large scale sailing model of the
Rattlesnake really got the wheels turning. (PDF's of all three parts of this article are in the Note's section.) The idea of building a large scale sailing model square-rigger
had always been floating around in my head, but seeing an article in a 1983 Model Ship Builder magazine about a large scale sailing model of the
Rattlesnake really got the wheels turning. (PDF's of all three parts of this article are in the Note's section.)
By 1998 I was fairly "settled down" from my wanderings on sail boats and schooners; I was married, had a regular job, a house - I was ready to finally build
my own RC square-rigger.
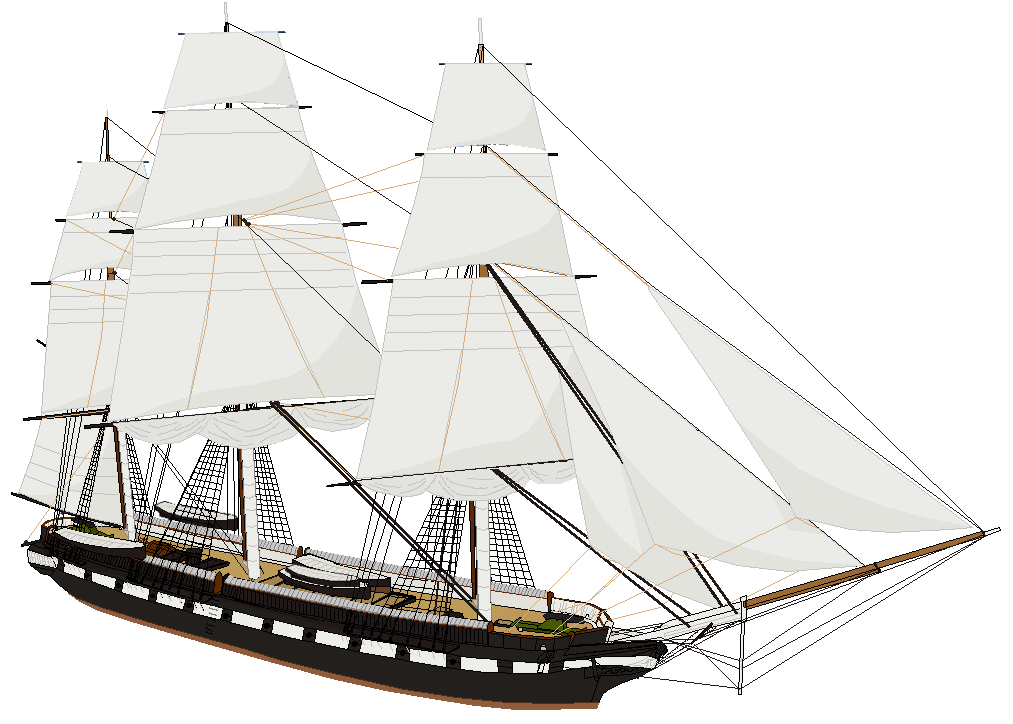
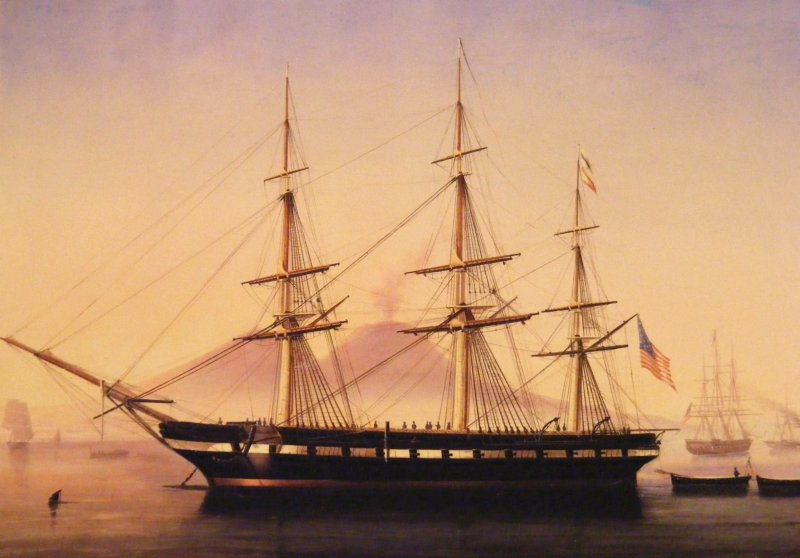
As I lived near Baltimore the with the Constellation then being rebuilt and restored to her proper appearance as a sloop of war, it seemed a perfect subject:
A local boat I could examine first hand and an interesting and yet undone subject to boot.

John Lenthall’s plans were drawn in 1:36 scale, or 1 inch = 3 feet.
A half model was also built in this scale which makes the hull slightly over 5 feet long on the spar deck.
 I felt this scale was right at the upper limit of what I could cram into the back of an SUV, while being large enough to sail on the local creeks without
looking like a bobbing cork. Soon I had copies of all the drawings I could find for the ship at the National Archives - including Lenthall’s 1:36 lines.
I felt this scale was right at the upper limit of what I could cram into the back of an SUV, while being large enough to sail on the local creeks without
looking like a bobbing cork. Soon I had copies of all the drawings I could find for the ship at the National Archives - including Lenthall’s 1:36 lines.
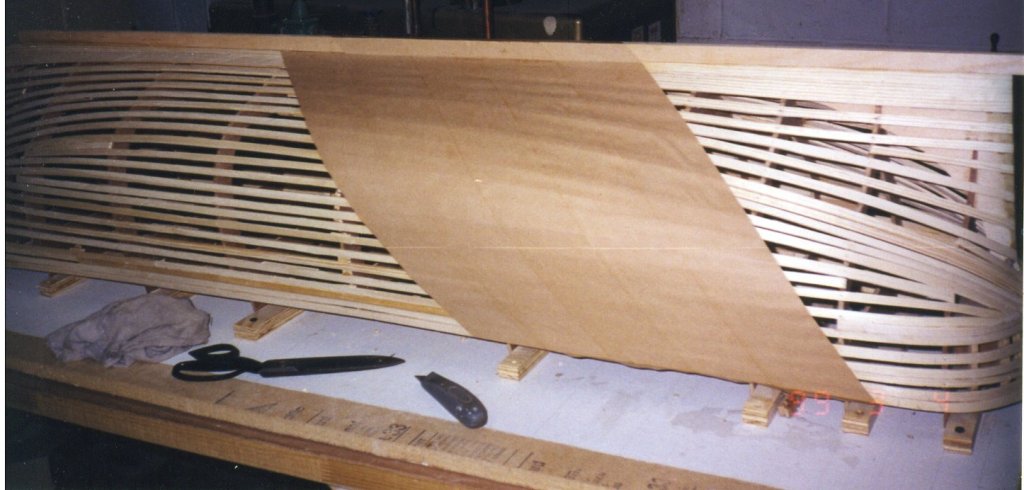
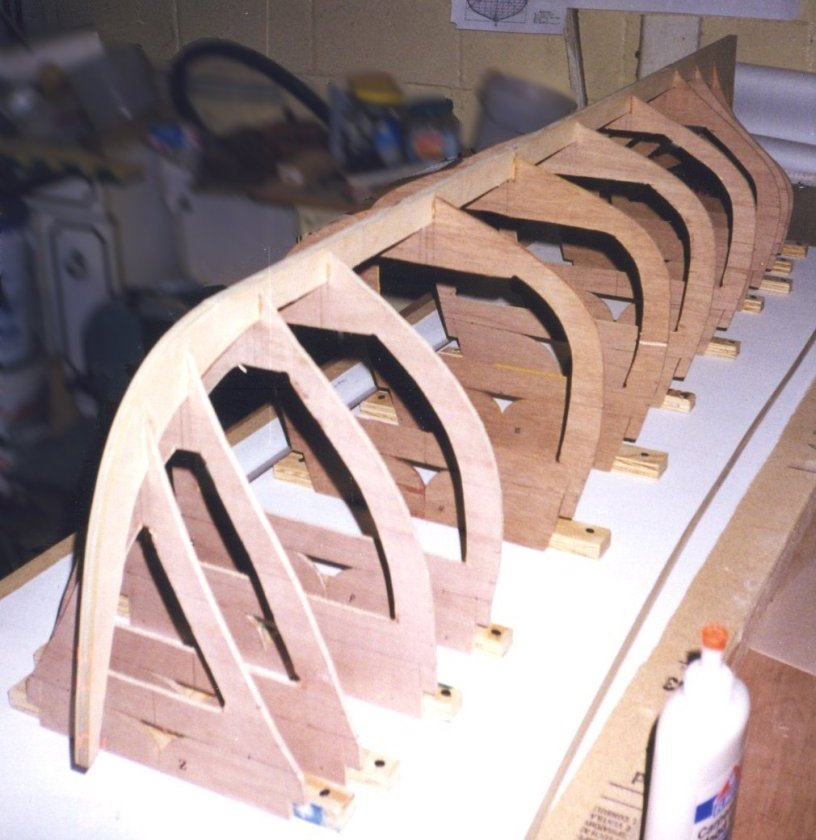 Guided by the MSB article, I began cutting the keelson, forms, and setting up the framework for the model in February of 99.
Then I found a copy of William Mowll's
Building a Working Model Warship:HMS Warrior, 1860.

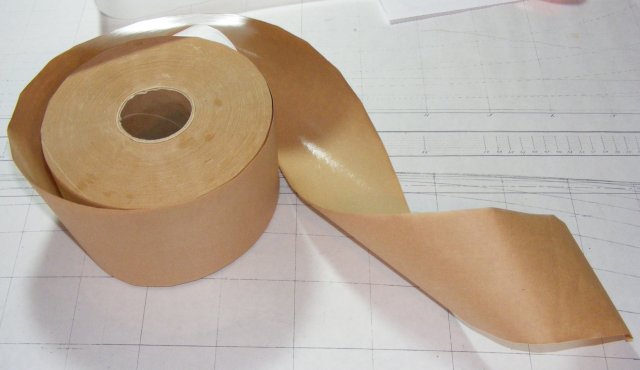
Mowll covered a battened form with gummed brown paper packing tape over which he applied masking tape to create a plug for making a fiberglass mold.
The masking tape would impart the texture of Warrior’s cast iron plating and other surface details. I happened to have a large roll of this tape
and got it into my head to do the same.
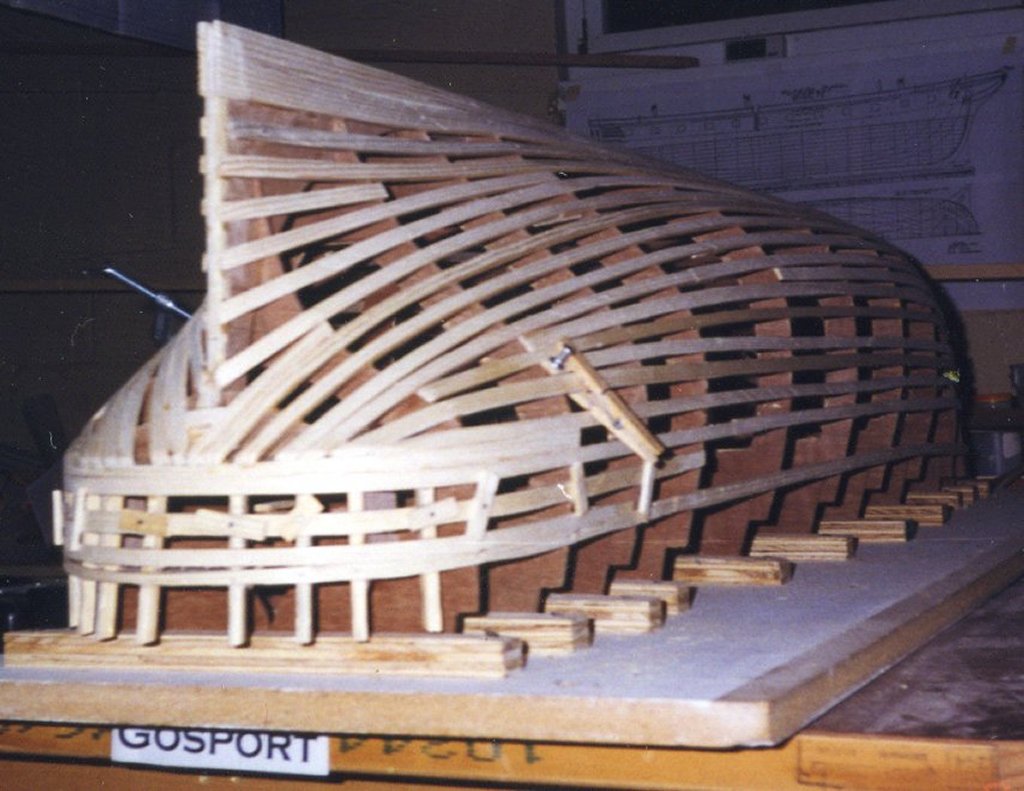
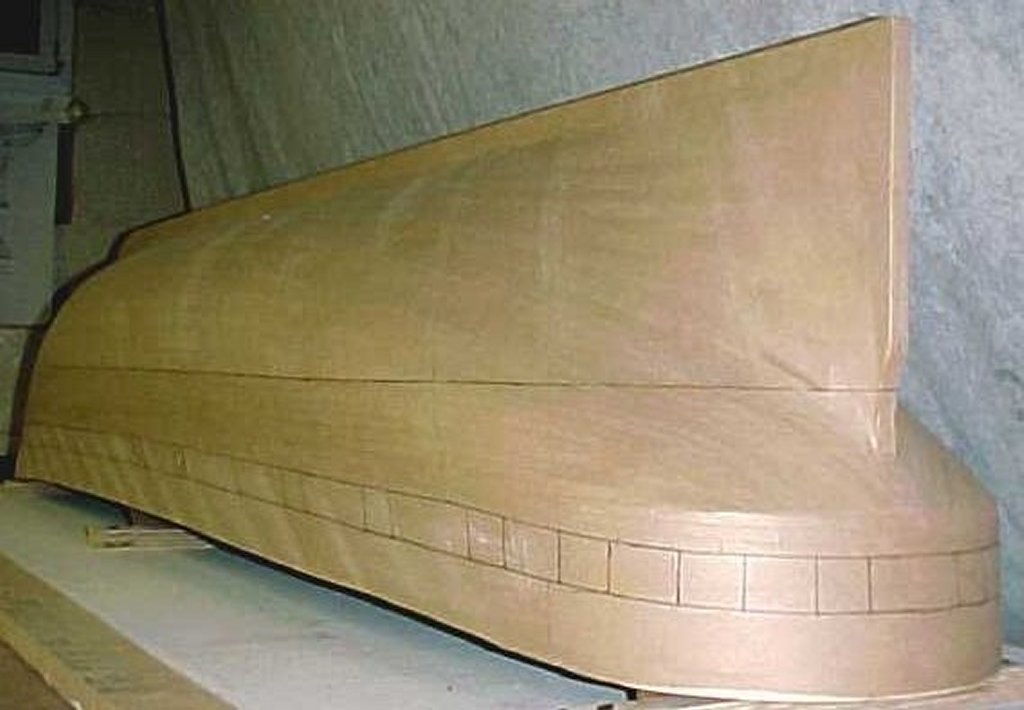
 The plan became to make a sacrificial plug, using the tape as Mowll had, including planking, coppering, and other surface details that would be taken up
by the mold. Then I would make three fiberglass hulls. One would be my model to RC and sail. The others would be finished unrigged as static models.
One would be donated to the ship, the other sold - figuring some local company would love to have a big model of the ship downtown in their lobby -
and the sale would pay for everything. The model would represent the ship as she appeared during the Civil War, since Im’ a Civil War reenactor.
The plan became to make a sacrificial plug, using the tape as Mowll had, including planking, coppering, and other surface details that would be taken up
by the mold. Then I would make three fiberglass hulls. One would be my model to RC and sail. The others would be finished unrigged as static models.
One would be donated to the ship, the other sold - figuring some local company would love to have a big model of the ship downtown in their lobby -
and the sale would pay for everything. The model would represent the ship as she appeared during the Civil War, since Im’ a Civil War reenactor.
The "plug" was battened down; keel, sternpost, and stem installed; and completely taped by March 4th. More tape was applied as planking, the waterline marked,
and then everything stalled.
Despite all the drawings I acquired from the archives, I was missing some important details and I needed to research things like the spar deck layout
(one of several drawings missing from the archives!).
The folks restoring the real ship pointed me to Mr Potter’s 1941 drawings for a 1:96 model distributed by A J Fisher that showed the deck arrangement
the restored ship has today, but these didn't jibe with Chappell’s drawing in The History of the American Sailing Navy, especially in the shape
of the main hatch and the galley hatch/trunk.
 As I dug around trying to determine what was right, life crept up. I remodeled the house; we sold the house; we moved to a small farm; I owned and
boarded some horses; I remodeled that house; my arranged job fell through and I wound up commuting 140 miles a day to the old job; we split up and
sold the farm; I moved to an apartment closer to work; a divorce; I bought a house, and finally, I pulled out the model and started working on it again
in the middle of 2008.
As I dug around trying to determine what was right, life crept up. I remodeled the house; we sold the house; we moved to a small farm; I owned and
boarded some horses; I remodeled that house; my arranged job fell through and I wound up commuting 140 miles a day to the old job; we split up and
sold the farm; I moved to an apartment closer to work; a divorce; I bought a house, and finally, I pulled out the model and started working on it again
in the middle of 2008.
The project recommenced with the original plan of making a sacrificial plug for a fiberglass mold.
My research had answered several questions, raised a few more, and altered the plan for the finished model slightly - I decided to finish the model as
the ship appeared in 1856 when she was painted by Tomaso de Simone in Naples.
The Model's Statistics:
- Scale 1:36 - 1 inch = 3 feet.
- Beam: 13-5/8" (34.6 cm)
- Length on deck: 61" (154.9 cm)
- Length between perpendiculars: 59-1/8" (150.2 cm)
- Draft, without ballast keel: 7" (17.8 cm) With 3-1/2" ballast keel: 10-1/2" (26.7 cm)
- Weight, with-out ballast or battery: 30 pds; battery: 5 pds; external ballast: 44 pounds; internal ballast: 15 pds; total: 94 pounds.
- Length over the rig: 95" (241.3 cm)
- Width over the rig: 30.5" (77.5 cm) ~ Main yard w/o stuns'l booms.
- Height bottom of keel to main truck, without ballast keel: 65" (165.1 cm) With ballast keel: 69" (175.3 cm)
- Total Sail Area: 2,623.26 square inches in 17 sails (18.22 sf, 16,924.21 scm)
- Minimum Sail Area: 1,148.77 square inches in 5 sails (8.75 sf, 7,411.38 scm)
Worklog Table of Contents:
1 - 1999: Beginning; Framing; Specifications (this page)
2 - 2009: Change in construction method; Fiberglass; Deck Beams; Rudder; Brace Winches
3 - First Float; Ballast; Enclosed Head; Stern Moldings; Quarter Galleries; Gunports
4 - Research; Deck Layout; Masts & Spars
5 - Paint; Copper Bottom; Mast Tops & Caps
6 - Bowsprit; Pivot Guns
7 - Ships Boats
8 - Crew Figures; Sail Making
9 - Yard Trusses
10 - Topmast Crosstrees; Prepping for first sail
11 - First sail
12 - 2012: Chain Plates; The ship's launch
13 - Launch continued
14 - Stern Windows and Medallions
15 - Internal additions; 2014 Baltimore Port Expo; Chesapeake Bay Maritime Museum
16 - 2014: New sail controls; Working Bowlines
17 - T'gallant masts; test dying Supplex; fair leads and routing control lines; Name on stern; pin rails
18 - Fair leads; Signal flags, Bumkins, Bumpkins, and Boomkins; T'gallant and royal yards shaped
19 - Mast damage and repair; rudder servo arm; Driver gaff and boom; Permanent Steering Installation
20 - Sub-Deck; Spars; Sails; Crew; Brass parts and tools; Ship's Wheel research
21 - 2015: Fore and Aft Access Hatches; Laying the deck
22 - Cap Rail; Hatch Coamings; Trys'lMast Step, Waterways and Hammock Rails
23 - Hammocks; Bow Bulwarks; Deck Fittings; Catheads; Bending Sails
24 - Setting up the Mechanicals; Hammock rail caps; 2015 Baltimore Port Expo; Forward Bulwarks; Winch Drums; Cradle Mod.
25 - Winch Drum Bearing Block; Entry Port boards; Hatch gratings.
26 - 2016: More Hatch gratings; Main Hatch; Launch-cart Ideas.
27 - Launch-cart build; Royals set.
28 - Royals, Courses, and Trys'ls; Controlling the tacks; Prepping to Sail.
29 - Second Sail in Open Water.
|
30 - New Winch Drums; Jack Stays; Aft Bulwarks.
31 - Tops'l yard tyes; Cathead cats; Tops'l yard parrels; bulwark support rods.
32 - 2017: Baltimore Port Expo; Main tops'l yard parrel; 2018: t'gallant pole repair; ballast rod alteration; main tops'l yard brace,
Course sails and Bentinck boom rods, chain-plates.
33 - Rigging to sail; Baltimore Port Expo; capstan; tops'l yard bow-trusses.
34 - Brace blocks, brace fairlead bar,transmitter settings,research,stuns'l fittings,wheel,skylight.
35 - 2019: Gunport eyebrows, Mast trucks, gun circles, pinrails, 3rd sailing, 3D printing, Boat Howitzer 3D model.
36 - Pivot gun, anchor, boading steps 3D models.
37 - 2022: 3D printing: Pivot guns, Boat howitzer, launch, anchors, oars, pilasters, pin-rails, fairleads, bullseyes.
38 - 3D printing: boarding steps, crew figures, lifebuoys, pin-rails, sky-light, anchor chain, wheel, gun circles, hammocks
39 - Sky-light, bitts, stuns'l fittings top rails, gun-port eyebrows, gratings, paint, working wheel, pivot gun paint.
40 - 2023: Paint, pin-rails, wheel rope blocks, blackening brass, futtock bands, hammocks, 3D printed rigging-screws.
41 - 2024: 3D printed ship's boats.
42 - New pivot guns and tracks, pin-rails.
43 - 2025: Pin-rails, Finishing the Bulwarks, Spray-screens, forward and aft cap-rails.
44 - Forward and aft cap-rails, bulwark end-boards, bow fairlead, spray-screens.
45 - Quarter-Davits, spray-screens, Painting crew, head-gratings, rub-rails.
46 - Head-gratings, 3D head ornamentation.
|
Next Page | Top
|
|
 |
|
 |
|
